
Officially

Officially....Mr. & Mrs. LeBlanc
Fairytale Signs
Mixed Media Art
 | ||||
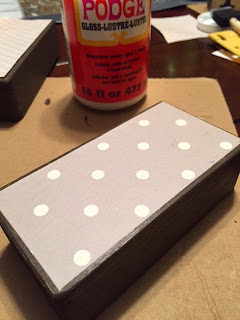
| This cute box is one of the "chunkie's" that I am working on. There is a lot of texture and layers of neutral colors in this project. It was definitely one of my favorites! |
 | |||
| Courage Strength Believe |
For my niece Ava, who is still battling a brain tumor. We love you sweet girl!!!
 |
| Family Rules Chunkie Box - mixed media art |


 | |
| 16x20 Mixed media Canvas Art. This is one of those projects you really need to see up close to see the textures, colors and layers of fun stuff. It sold within minutes of posting, which made me happy and sad. I had fallen in love with it but it went to a happy and deserving home. |
 |
| 16x20 Mixed media Canvas Art. Another fun canvas that has so many layers of yummy colors and texture. There are even some hidden messages in there that are super special. |
A Merry Little Christmas Tile

I love look of this christmas tile. Because I have a lot of extra tiles from our kitchen floor, I used one of them to spray with a glossy black paint. I didn't use a clear sealer on this one since it already had a gloss finish with the spray paint. I've used chalk paint on tiles, and because it's a flat finish, I always use a clear glossy sealer over before putting any lettering down.
Baby it's Cold Outside

I lightly brushed on some white satin paint, and then sanded it down. I intentionally didn't put paint all over the sides and in the corners. I wanted it to have a really distressed look.
I designed the lettering and snowflake with my software and printed it out in vinyl. I used it as a stencil instead of placing the letters down. The final step....Minwax Jacobean stain. I love that color!
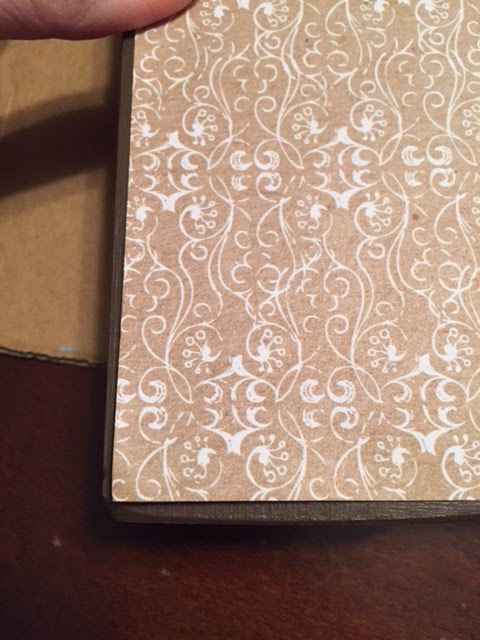
This sign was made with a 12x12 1/4" mdf board.
I mod podged a piece of tan cardstock. If you look
closely, you will see it has a raised design on it.
I sanded it and antiqued around the edges with some
brown acrylic paint. I sprayed a coat of clear gloss
sealer on before placing the lettering down.
The lettering was designed on my software and then
printed out and placed on.

Owl Trio Blocks

I. Love. Owls. There, I said it! I really do though. They are so adorable and I see them everywhere now that I am using them more in my home decor. I have another reason, but I will announce that in a later post. (no, I'm not expecting).
For the bottom two pieces of wood, they are both 2x3's, the bottom being 7", and the middle is 6". The owl block is a 2x4 cut to approx 4.5". I wasn't going to add the papers as the background, but there was just something blah about them. I love chevron, so of course when I saw I had a tan color that matched perfectly, I knew that was what it needed. The owl and letters are all a chocolate brown color. I used a dark wax to age the edges and the front of the owl block. So adorable.
Pallet Art: God gave me you...

I used wood shims for this pallet. Cute, eh!? Now, as you probably know, shims aren't the exact width, they have a thicker and thin end. That's okay though, because I kind of like the looks of it. I tried flipping the shims back and forth, so that it was a really uneven look, but I decided to keep them all going the same direction. You can't tell from the picture, and you really have to get up super close to it to even know they aren't the same thickness. I used gorilla glue and attached a shim at the top and the bottom of the backside. Once it dried, I used Minwax wood stain in Provincial. I printed the vinyl out and took the letters out, not the background of the vinyl, and used it as a stencil. I love the type writer font, don't you!? The little birdies were also in a font package I had downloaded. I added the initials "S" and "K" for my friend and her husbands initials. (This ended up being a surprise birthday gift for her). So, know that I have used wood shims to make my own pallet, I do believe I will be making quite a few more projects with them!
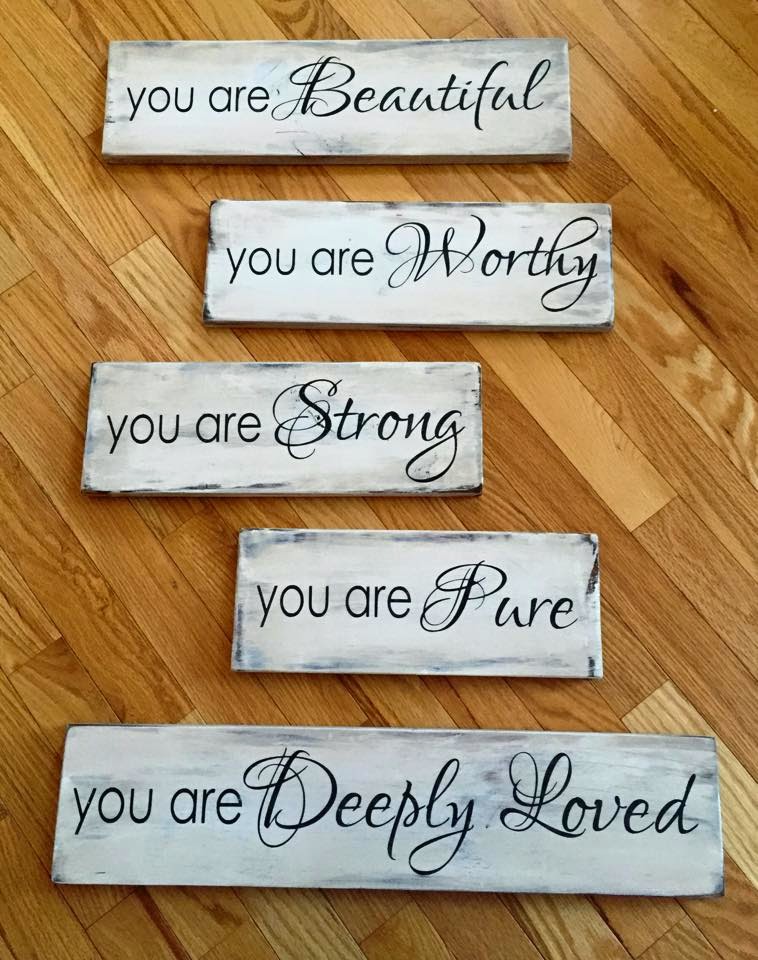
you are...Beautiful, Worthy, Strong, Pure and Deeply Loved
A customer recently ordered some signs with these quotes on them. I have to say I'm in love with them. So much so, that I made another project with them as well, on a canvas. Here is a picture of how the rustic looking signs turned out. She wanted each one to be done on a sign, instead of one larger sign. That way she had the option of hanging them together on a wall, or moving one or all to different places if she wanted to. I made the lettering the exact same size, and then cut the wood to the appropriate lengths. I used the vinyl as a stencil for this project. I painted the wood white, then placed the lettering on top and stenciled the black paint. I gave it all a good sanding once I peeled the vinyl stencil off. I stained the entire board with Minwax Provincial.
And, here is a picture of project #2 with the same quotes:

I used a 12x16 canvas and cut the teal and grey papers to fit. I used mod podge to glue the papers to the canvas. I used some grey paint to "age" the edges and in between all of the papers. Once the lettering was on, I sealed the entire project with glossy mod podge. It's a beautiful canvas. I love reading these words!
Every Love Story is beautiful...and spray painting vinyl!


I made the tile (to the right) first, and then I had a customer ask if I could s t r e t c h it out so she could put it above her bed. So, I made it into a 3ft board. I think it turned out quite beautiful.
Valentines Day Projects 2015...
I've been having a lot of fun making various projects. These first three pictures are all done on 12x12 tiles. I have a lot of extra tiles left over from our kitchen floors. I decided to try painting them to see if it would stick. It does! I cleaned the tiles with rubbing alcohol first, then I lightly sanded the entire surface. The first two pictures have white latex paint in a satin finish. The teal colored one is the homemade chalk paint that I made for other projects. Both of the paints seemed to adhere great, but before I put the vinly lettering on, I antiqued the edges of the white tiles with some black acrylic paint, and then I put a coat of matte mod podge over the entire surface, just to seal it really well first.


I made these adorable mini cube LOVE blocks. Aren't they cute?! I love anything teeny tiny like this.
I used 2x2's, which aren't really 2x2, but whatever. I cut some co-ordinating papers and after painting and sanding the blocks, I used mod podge to adhere the papers. I cut the letters with my vinyl cutter and placed them on the papers. I used a dark wax to antique the edges of both sets.


I had some 1/4" mdf left over from another project, so instead of painting the entire piece, I decided to mod podged a piece of white cardstock to the board. I painted the edges black, and then did the antiqued look with black paint around the edges of the white paper as well.
Rustic Centerpiece Boxes

I have a really long kitchen table. I thought a long rustic centerpiece box would be the perfect way to display these pretty hydrangeas in mason jars. I used 1x4's for this project. I cut three pieces 30" long, and then two end pieces. I don't remember the size, but it was easy enough to just mark the wood and cut.
Since I don't own a nail gun (sad face) I used gorilla glue to hold the pieces of wood together, and then I used nails with flat heads so that it was nice and flush with the surface. I filled the small gaps with stainable wood filler, and let it dry overnight. I gave it a good sanding and cleaned off the dust with a dry cloth. I stained the entire box with Minwax wood stain in Provincial.
I have a lot of mason jars, and this particular size fit perfectly! I found the hydrangea blooms at the Dollarama, and was lucky enough to buy the last 5 they had left. I cut the stems so that they rested right on the top of the jars. I'm going to add some twine and possibly a decorative tag or a vinyl lettering word in the corner, but for now, it looks just fine to me. :)
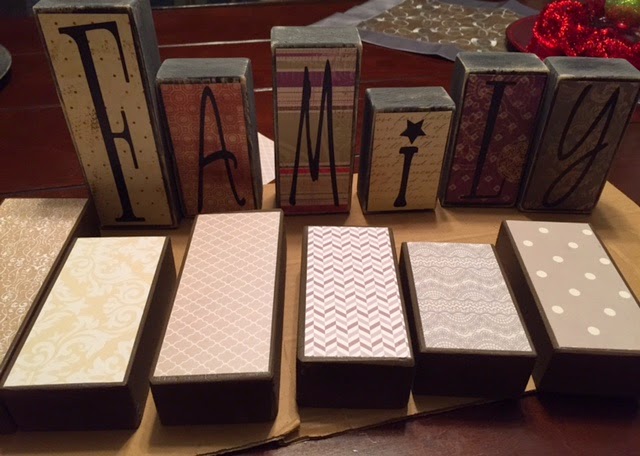
Tutorial on how I make my Name Blocks
I've done a million sets of these name blocks. Ok, well, maybe not a million, but it sure felt like it before christmas. I've had a lot of questions on how I get my papers to be so smooth when I mod podge. I am the. mod. podge. queen. I love this stuff!
I buy the 2x3 wood from Home Depot, and then cut various lengths from 4' - 7". I sand them, and then paint whatever color I'm going to be using for that set of blocks.
I choose my papers and cut them to fit just a tad bit smaller than blocks, as you can see in the picture below.
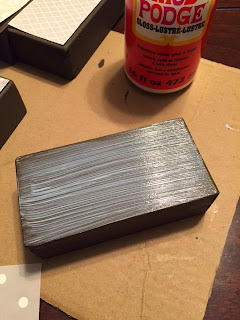
I then place a thin and even coat of mod podge over the entire surface of the block.
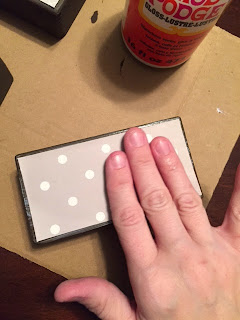
I line up the paper, and start smoothing it from the center out. Once I've done that a couple of times, I run my fingers around the edges of the paper. I find it sometimes lifts up a bit, so this makes the edges lay super flat!
I always wait a minimum of 15 minutes before I do anything else to the blocks.
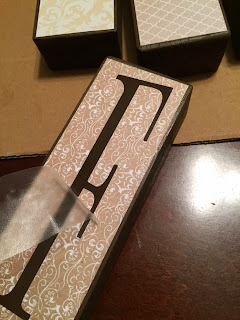
Now it's time to put the lettering on! I center the vinyl, and peel the transfer tape off.
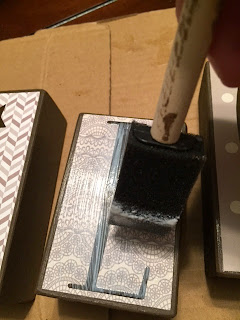
I put another coat of mod podge over the lettering AND the entire block. I use the gloss because I like the subtle shine it gives to the entire look of these blocks.
And voila! Here is the final look...they are quite adorbable.
I choose my papers and cut them to fit just a tad bit smaller than blocks, as you can see in the picture below.

I then place a thin and even coat of mod podge over the entire surface of the block.

I line up the paper, and start smoothing it from the center out. Once I've done that a couple of times, I run my fingers around the edges of the paper. I find it sometimes lifts up a bit, so this makes the edges lay super flat!

I always wait a minimum of 15 minutes before I do anything else to the blocks.

Now it's time to put the lettering on! I center the vinyl, and peel the transfer tape off.

I put another coat of mod podge over the lettering AND the entire block. I use the gloss because I like the subtle shine it gives to the entire look of these blocks.

And voila! Here is the final look...they are quite adorbable.
Harry Potter Canvas Subway Art

I just finished this project last night. I have to say I love how it turned out! We are huge Harry Potter fans in this house, so, after finding a similar idea online (it was a digital print found HERE on etsy) I decided to make it into a canvas subway art project for my sons room. I used a 16x20 canvas. I mixed gesso and a tiny amount of light tan acrylic paint to prepare the background surface. I wanted it to look a little "aged", so I made it look a bit streaky. I even used my fingers and rubbed some of the tan color around the edges. I let it dry completely, and then started to place the vinyl lettering on. If you've ever tried putting vinyl on canvas, it's a pain. The gesso really helps in giving the vinyl a little more to adhere to. That's the best way I can describe it. :)
I printed the vinyl in three colors. The chocolate brown was done in one piece, the tan and burgundy were printed out and then placed on in separate pieces. I sealed the entire canvas with a good coating of matte mod podge. I may add a little more of an "aged" look to the edges, but for now, I am in love with it! I'm pretty sure my son is going to love seeing it hanging on his bedroom wall!
Chalkboard Crossword Art
Happy Canadian Thanksgiving! I love this time of year. I live in Moncton, NB, and the colors of the leaves right now are so beautiful. I took a panoramic of my front yard...well, part of it. We have the cutest little green house, called the "Libra House". I didn't name it, but it suited me well because I am a Libra. So, the name stuck. Isn't the view beautiful? I love it.

I've been working on a lot of projects lately. I turned this frame into a big chalkboard. I should have taken a picture of the before. It was quite the looker. It was an ugly brown frame and had a hideous vase of flowers. I'm sure in it's own time it was beautiful. Because I've been painting walls, I had a can of primer, so I gave it a good coat. I then used a satin white paint over that. I took a chance and bought a small jar of chalkboard paint from walmart. It was only $8, give or take a bit, and I was really impressed with how it turned out. Because the print was a canvas like texture, I put a coat of primer on it as well. It took about 3 coats of chalkboard paint to get a good coverage. I let it 'cure' for a day, and then I took my piece of chalk, turned it sideways, and colored the entire surface. I've had a few sayings on it since it was finished. It's great for birthdays, holidays, and for those inspiring quotes that I love to collect. I always give credit where credit is deserved. I found the idea at newlywoodwards.com. You can find the link HERE.

I've been working on a lot of projects lately. I turned this frame into a big chalkboard. I should have taken a picture of the before. It was quite the looker. It was an ugly brown frame and had a hideous vase of flowers. I'm sure in it's own time it was beautiful. Because I've been painting walls, I had a can of primer, so I gave it a good coat. I then used a satin white paint over that. I took a chance and bought a small jar of chalkboard paint from walmart. It was only $8, give or take a bit, and I was really impressed with how it turned out. Because the print was a canvas like texture, I put a coat of primer on it as well. It took about 3 coats of chalkboard paint to get a good coverage. I let it 'cure' for a day, and then I took my piece of chalk, turned it sideways, and colored the entire surface. I've had a few sayings on it since it was finished. It's great for birthdays, holidays, and for those inspiring quotes that I love to collect. I always give credit where credit is deserved. I found the idea at newlywoodwards.com. You can find the link HERE.
You are my sunshine
I made this canvas for her, as well as another one for a fund raiser they had. I cut the paper to 12' widths, and then mod podged them onto the canvas. I applied the vinyl, and then distressed the edges with an antiqued pink color. I then put another coat of mod podge, in satin finish, to seal everything. So adorable....just like Ava.
I heard her singing this song one morning, and when I peaked into the room, she was running her fingers along the words as she sang.
Ava...you are MY sunshine. You make me happy when skies are grey. You will never know dear, how much I LOVE YOU!


Baby Boy Nursery Dots

"In this House" - Pre-Designed Subway Art

Inexpensive and FUN Valentines Day Gifts

All three projects are cute and inexpensive. The stacking trio hearts were made from some left over 2x4's. I painted the blocks red, then changed my mind and painted them black. I sanded the edges and ended up really liking the red showing through anyways. I mod podged the paper onto the front of the wood and then gave the entire thing a coat of mod podge
The Cubes were mentioned in a previous post (see below this one). The "i love you because..." frame was made after finding a similar idea on pinterest. Such a cute way to remind those we love about the little things that matter. The paper is changeable and the messages are written with a dry erase marker. So cute! Here is a closer look:

Valentines Day Cubes

Playroom Vinyl

Finished size: 15" x 22"
Price: $18
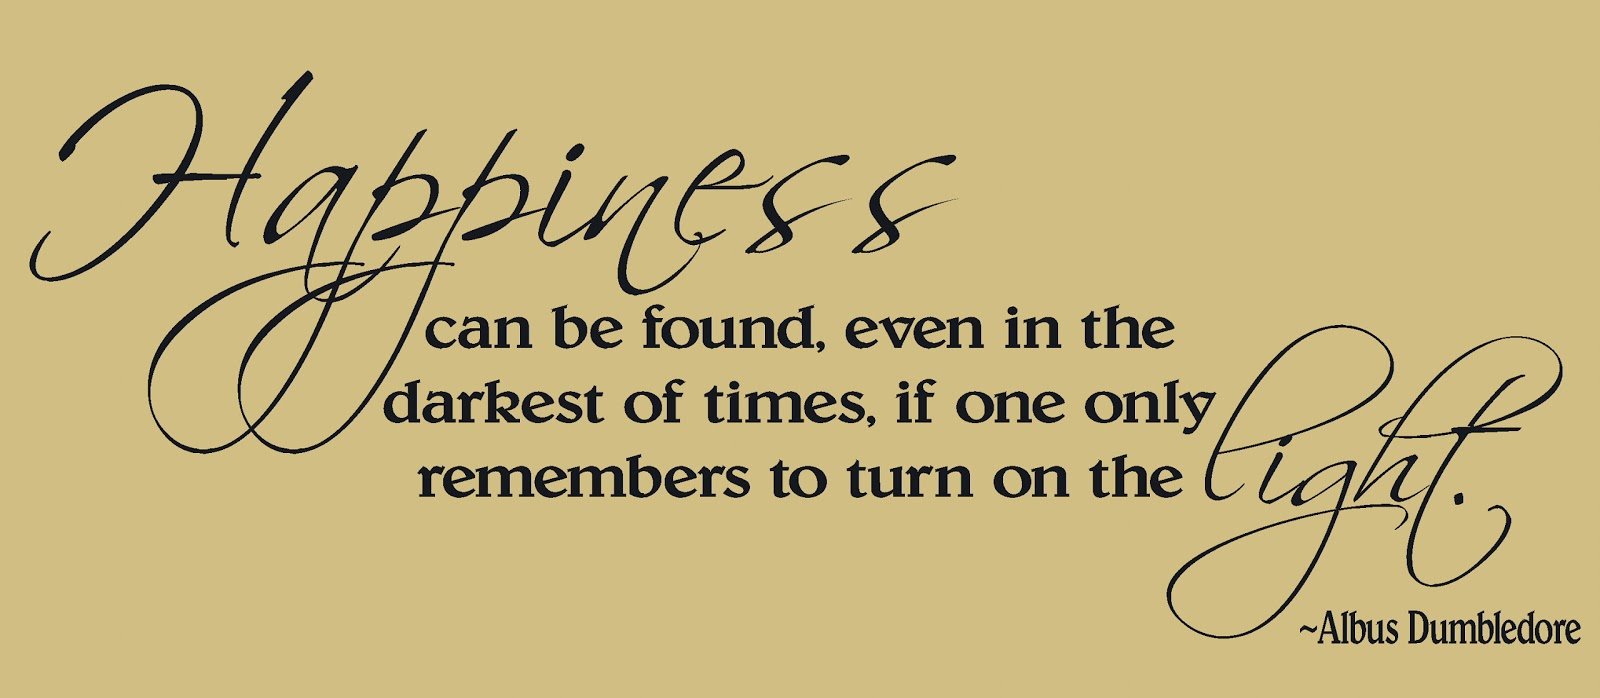
Harry Potter Quote by Dumbledore
In honor of my son, who is quite consumed with Harry Potter movies right now, I found this quote by Albus Dumbledore. I have gone through some darker times in my life, because of the trials we've been given. This is a great reminder...

Vinyl lettering is available to purchase!
Vinyl lettering is available to purchase!
Subscribe to:
Posts (Atom)
Popular Posts
-
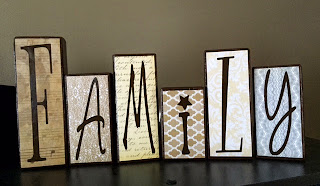
 I love love love these! They look great on a shelf, counter, leaning against a wall, anywhere really!
 -
 A customer recently sent me this quote, asking if I could come up with a design for her. I loved it so much I had to use it on my walls too!
 -
 Subway Art - another favorite thing I have become addicted to. This is the second class project I'm offering on Jan 22nd and 29th. Finis...
 -
 In honor of my son, who is quite consumed with Harry Potter movies right now, I found this quote by Albus Dumbledore. I have gone through so...
 -
 I've done a million sets of these name blocks. Ok, well, maybe not a million, but it sure felt like it before christmas. I've had a ...
 -
 I've been staring at this spot on my Keurig coffee machine for months now, and I've finally come up with what I...
 -
 I love using old cabinet doors to create something fun and unique. This christmas collage has to be one of my favorite projects this season...
 -
 I absolutely LOVE subway art and if I could get away with putting it up ALL over my home, I would. I also LOVE reading this because ... it&#...
 -
 I've seen similar ideas all over Pinterest, so I decided to do one for myself! I gathered broken, odd shaped, rough looking scraps of ...